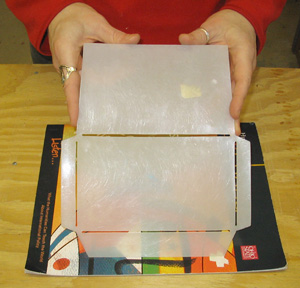
This is the template I use for making envelopes. I bought it years ago from a company that doesn't exist any more, but it's easy enough to make your own. Just take a regular envelope of the size you'd like to make, and slice it open on all its seams with a razor blade. Trace it out onto cardboard, and cut it out.
The large flap I'm holding will make the inside body of the envelope. The shorter flap opposite it will make the closing flap. (I'm only pointing this out because all my early envelopes were not made that way - I thought the large flap was the closing flap! Oops.)
|
I like the commercial templates better than handmade ones because they are made of milkbottle plastic, and thus are a little bit translucent. So if you're trying to get a particular design on the paper centered onto the envelope, it's really easy to see right throught the template and center it perfectly. It's a little harder with cardboard.
Draggin Ink sells lots of wonderful templates, and they are only a few dollars each. I've ordered from them before, and the quality is really nice.
|
 |
Trace around the outside of the template onto the piece of paper you want to use for the envelope. If the paper is wider or longer than the template, just continue the lines out to the border and make the flaps larger. You can see my template has slits in it to ink out the folding lines. If you make a template, don't bother trying to put those in. If you ink in the folding lines, you'll still see the ink lines on the finished envelope, which I find unsightly.
|
 |
Another nice thing about this particular template is that it's easy to adapt it and make an envelope that is larger than the template. Trace out the top left corner, then slide the template to the right and trace out the top right corner. Put the template back in the top left corner, and then slide it down and trace out the bottom left corner. Then slide it to the right and trace out the bottom right corner. By sliding the template (and keep it lined up with the border of the paper) you are creating an envelope body that is wider or longer than the original template. The flaps will still be large enough to cover the larger envelope.
|
 |
This is what the envelope looks like after I cut it out. Notice the side flaps and the body flap (the part on my hands) are longer than the template. I figure I might as well use as much of the paper as I can.
|
 |
Fold the side flaps in, and then the body flap up and over side flaps.
|
 |
I use Gluestick to seal the envelope side flaps to the body flap. I found a wet glue like Elmer's left wrinkles in the envelope flaps, and I didn't like how that looked. I also use a Gluestick to seal the envelope before I mail it.
|
 |
Here are some envelopes that were made with this envelope template. Bored with using mail order catalogs for making envelopes? Used gift wrap and old road maps also make wonderful envelopes.
|
If the finished envelope has a light area where the address would go, you can certainly pen the address right onto the envelope, especially if you use a Sharpie or some other dark thick pen. We want the postal service to actually take our handmade envelopes and get them through the system! But if the envelope is dark, I will use a plain address label and pen the address on that. I used to do a lot of mailings with my laser printer, and I printed all the address labels onto label paper for the mailings. Label paper has 20 labels per page. Invariably, though, my mailing list would not have a perfect multiple of 20, so I'd have leftover labels on the last page. I saved all those last pages, and I use those blanks for my handmade envelopes.
Or you can use a silver metallic gel pen on those dark envelopes; I love the way those look!
I hope you try making your own envelopes; they're free and pretty and help reuse some of the waste paper that you shouldn't burn in your fireplace or may not be recyclable in your area.
|
 |
©
Copyright 2007. All rights reserved.
Contact: Donna Albino |
|


